Inline Editable WebGrid Using jQuery and ASP.NET MVC 5 With Entity Framework 6
Posted By: Ajay Saptaputre, 12 Oct,2015 | Total View : 23842
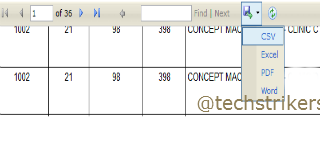
In my previous article I discussed about create CRUD operation using Scaffolding with ASP.NET MVC 5 and database first approach using ASP.NET MVC 5 and Entity Framework 6 and WebGrid in MVC 5 with Razor view and Entity Framework 6
In this article I am going to discuss how to create editable WebGrid which will provide you a functionality of inline editing using jQuery. Basically WebGrid does not have any built-in editing facility, but you can achieve it using JQuery. The key idea behind this approach is to first populate the WebGrid with editable and read-only presentations of the data. With the help of jQuery, switch between the two presentations on a line-by-line basis.
ASP.NET MVC does not have any built in data binding controls like GridView, DetailsView etc. WebGrid provides similar functionality like other data binding controls provides like sorting, paging, ordering, column formatting etc. WebGrid makes developers life easy and saves there time rather he has to write code to display data in tabular manner.
In order to start our sample application we will need database table, entity and DBContect classes to fetch the data from database. In this article I am not covering steps those are already covered in my previous article. If you did not read, please refer database first approach using ASP.NET MVC 5 and Entity Framework 6 and follow Step 1 to Step 16 it will help you to understand this article.
Step 1: I hope you already red my previous article. Now, right click on Controller folder and select Controller from menu as below screen shot.
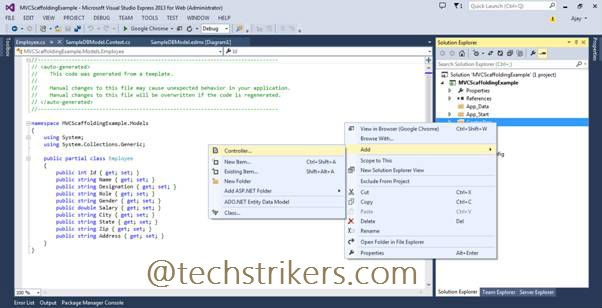
Step 2: Select MVC 5 empty controller, rename controller name as "EmployeeController". Click on "Add" button.
Step 3: Now add below code to controller class. Notice that, I have two action methods; "Index" and "Update". The "Index" is just returning list of "Employees" whereas on other hand "Update" method is decorated with "[Post]" attribute. That means, this will take care when page is post the data to the controller.
using System;
using System.Collections.Generic;
using System.Linq;
using System.Web;
using System.Web.Mvc;
using MVCDisplayWebGrid.Models;
using System.Web.Helpers;
using System.Data.Entity;

namespace MVCDisplayWebGrid.Controllers
{
    public class EmployeeController : Controller
    {
        EmployeeDBContext db = new EmployeeDBContext();
        public ActionResult Index()
        {
            return View(db.Employees.ToList());
        }

        [HttpPost]
        public ActionResult Update(Employee employee)
        {
            if (ModelState.IsValid)
            {
                Employee emp = db.Employees.Single(em => em.Id == employee.Id);
                emp.Name = employee.Name;
                emp.Designation = employee.Designation;
                emp.Gender = employee.Gender;
                emp.City = employee.City;
                emp.State = employee.State;
                emp.Zip = employee.Zip;
                db.Entry(emp).State = EntityState.Modified;
                db.SaveChanges();

            }
            return RedirectToAction("Index");
        }
	}
}
Step 4: Now right click on "Index" action method, select "Add View" and select "Empty" template from dropdown. To build view we will need to specify model class as "Employee" and data context class as "EmployeeDBContext" as below screen shot illustrate. Click "Add" button. This will add IEnumerable Employee object in view page as below.
@model IEnumerable<MVCDisplayWebGrid.Models.Employee>
Step 5: In this sample code, first part includes jQuery code that manage switching between the two modes edit and display (read-only). So let's add below JQuery code in "Index" page. Also remember that to include "jquery-<version>.min.js" file. The below JQuery code initially hide all editable items, onclick of edit button toggle the display mode to edit mode and start displaying "Save" and "Cancel" button. When clicks on "Save" button, it will read all the editable input controls and construct employee JSON object. Letter, these JSON object is post asynchronously via JQuery AJAX call to the controiller's "Update" action method. If record updated successfully in the DB, it will return the confirmation message. See below code snippet:
<script type="text/javascript">
    $(function () {
        $('.edit-mode').hide();
        $('.edit-user, .cancel-user').on('click', function () {
            var tr = $(this).parents('tr:first');
            tr.find('.edit-mode, .display-mode').toggle();
        });
        $('.save-user').on('click', function () {
            var tr = $(this).parents('tr:first');
            var EmpID = tr.find("#EmpId").html();
            var EmpName = tr.find("#Name").val();
            var EmpDesignation = tr.find("#Designation").val();
            var EmpGender = tr.find("#Gender").val();
            var EmpCity = tr.find("#City").val();
            var EmpState = tr.find("#State").val();
            var EmpZip = tr.find("#Zip").val();

            //Creating Employee JSON object
            var EmployeeModel =
            {
                "Id": EmpID,
                "Name": EmpName,
                "Designation": EmpDesignation,
                "Gender": EmpGender,
                "City": EmpCity,
                "State": EmpState,
                "Zip": EmpZip
            };
            //Posting Employee object to controller's Update action method
            $.ajax({
                url: '/Employee/Update',
                data: JSON.stringify(EmployeeModel),
                type: 'POST',
                contentType: 'application/json; charset=utf-8',
                success: function (data) {
                    tr.find('.edit-mode, .display-mode').toggle();
					alert('Record updated Successfully!!');
                }
            });
        });

        $('.edit-user').on('click', function () {
            var tr = $(this).parents('tr:first');
            var EmpID = tr.find("#EmpId").html();
            var EmpName = tr.find("#Name").val();
            var EmpDesignation = tr.find("#Designation").val();
            var EmpGender = tr.find("#Gender").val();
            var EmpCity = tr.find("#City").val();
            var EmpState = tr.find("#State").val();
            var EmpZip = tr.find("#Zip").val();

            tr.find("#lblName").text(EmpName);
            tr.find("#lblDesignation").text(EmpDesignation);
            tr.find("#lblGender").text(EmpGender);
            tr.find("#lblCity").text(EmpCity);
            tr.find("#lblState").text(EmpState);
            tr.find("#lblZip").text(EmpZip);
        });
    })
</script>
Step 6: Second part of these sample code is to add CSS style in order to improve look and feel of WebGrid, as per your requirement. See below code snippet:
<style type="text/css">
    .edit-mode {}
    .edit-user {}
    .edit-user display-mode {}
    .save-user edit-mode {}
    .display-mode {}
    .cancel-user {}

    .webgrid-table {
        font-family: Arial,Helvetica,sans-serif;
        font-size: 14px;
        font-weight: normal;
        width: 750px;
        display: table;
        border-collapse: collapse;
        border: solid px #C5C5C5;
        background-color: white;
    }

        .webgrid-table td, th {
            border: 1px solid #C5C5C5;
            padding: 3px 7px 2px;
        }

    .webgrid-header, .webgrid-header a {
        background-color: #0094ff;
        color: #ffffff;
        text-align: left;
        text-decoration: none;
    }

    .webgrid-footer {
    }

    .webgrid-row-style {
        padding: 3px 7px 2px;
    }

    .webgrid-alternating-row {
        background-color: azure;
        padding: 3px 7px 2px;
    }

    .col1Width {
        width: 55px;
    }

    .col2Width {
        width: 220px;
    }
</style>
Step 7: Third part of these sample code is to instantiate WebGrid control and hands it over to Model. Now call GetHtml() method of WebGrid to display sample data list. Notice that there are two items in each of the cells, one is to display mode and one is for edit mode. Initially "edit-mode" will be hidden. All read-only items are decorated with "display-mode" and editable items are decorated with "edit-mode" using CSS class. Rest JQuery will be taking care of handling different modes of WebGrid. See below code snippet screen shot::
@{
    var grid = new WebGrid(source: Model, canPage: true, rowsPerPage: 10);
}

<div id="gridContent" style="font-family: Arial; padding: 20px;">
    @grid.GetHtml(tableStyle: "webgrid-table",
    headerStyle: "webgrid-header",
    footerStyle: "webgrid-footer",
    alternatingRowStyle: "webgrid-alternating-row",
    selectedRowStyle: "webgrid-selected-row",
    rowStyle: "webgrid-row-style",
    mode: WebGridPagerModes.All,
    columns: grid.Columns(
        grid.Column("ID", format: @<text><span class="display-mode">@item.ID</span>
		<label id="EmpId" class="edit-mode">@item.Id</label></text>,
                    style: "col1Width" ),
        grid.Column("Name", "Name", format: @<text><span class="display-mode">
		<label id="lblName">@item.Name</label></span>
        <input type="text" id="Name" value="@item.Name" class="edit-mode" /></text>, style: "col2Width"),

         grid.Column("Designation", "Designation", format: @<text> <span class="display-mode">
		 <label id="lblDesignation">@item.Designation</label></span>
        <input type="text" id="Designation" value="@item.Designation" class="edit-mode" />
		</text>, style: "col2Width"),

        grid.Column("Gender", "Gender", format: @<text> <span class="display-mode">
		<label id="lblGender">@item.Gender</label></span>
        <input type="text" id="Gender" value="@item.Gender" class="edit-mode" /></text>, style: "col2Width"),

        grid.Column("City", "Designation", format: @<text> <span class="display-mode">
		<label id="lblCity">@item.City</label></span>
        <input type="text" id="City" value="@item.City" class="edit-mode" /></text>, style: "col2Width"),

        grid.Column("State", "Designation", format: @<text> <span class="display-mode">
		<label id="lblState">@item.State</label></span>
        <input type="text" id="State" value="@item.State" class="edit-mode" /></text>, style: "col2Width"),

        grid.Column("Zip", "Zip", format: @<text> <span class="display-mode">
		<label id="lblZip">@item.Zip</label></span>
        <input type="text" id="Zip" value="@item.Zip" class="edit-mode" />
		</text>, style: "col2Width"),

    grid.Column("Action", format: @<text>
        <button class="edit-user display-mode">Edit</button>
        <button class="save-user edit-mode">Save</button>
        <button class="cancel-user edit-mode">Cancel</button>
    </text>, style: "col3Width", canSort: false)
   ))
</div>
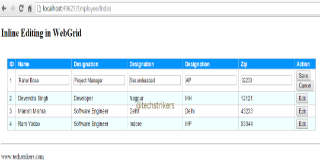
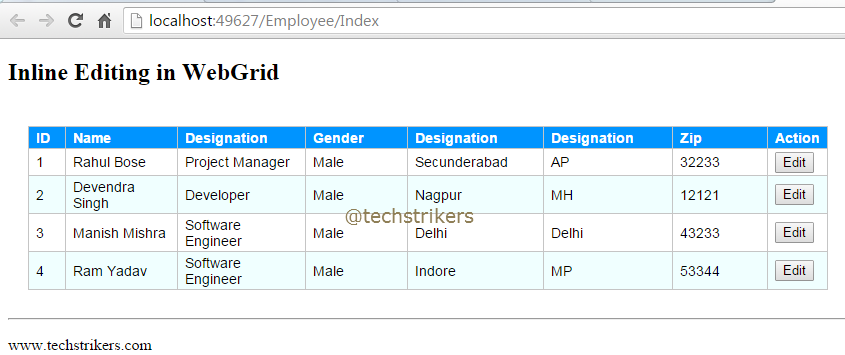
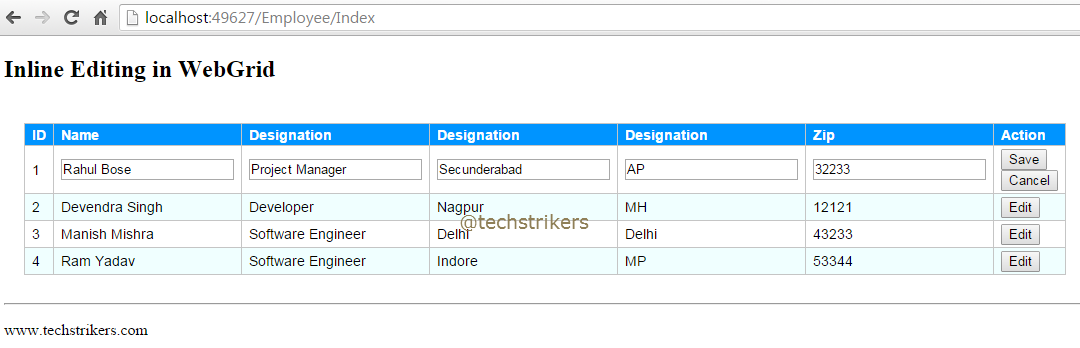
Step 8: All right, our sample ASP.NET MVC 5 editable WebGrid application is ready to fly. Run the application or press F5.
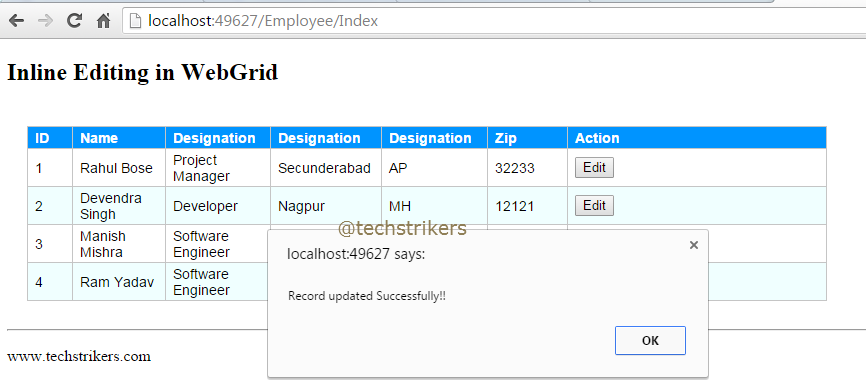
Step 9: Now click on "Edit" button, you can see here all the read-only fields are toggled into edit mode. Update field's value and click on "Save" or "Cancel button. Once you click on "Save" button confirmation popup message will display.
Appreciate your valuable feedback:
I hope this article is useful for you. I look forward for your comments and feedback. So please provide your valuable feedback so that I can make this blog better. You can also share this article by hitting below button.
Happy learning...