Implement custom user registration and login page with the help of Entity Framework using AES encryption in ASP.NET MVC application
Posted By: Ajay Saptaputre, 13 Dec,2015 | Total View : 30002

In my previous article I discussed about JQuery DataTable Bind JSON Using ASP.NET MVC 5 and Entity Framework 6 and Scheduled Tasks In ASP.NET With Quartz.Net and JQGrid Server-Side processing using HttpHandler in ASP.NET.
In this article I am going to explain how to implement custom user registration and login page and how to store user information into the database with the help of Entity Framework in ASP.NET MVC application. In this article, I am using AES Cryptography to encrypt user password before storing into the database with the help of Entity Framework code first approach.
Sometimes you need to implement custom user registration and login mechanism in web application to implement authentication in ASP.NET MVC application. However, you have other options to implement authentication in ASP.NET MVC application, such as ASP.NET Membership and Identity. In this approach, you have flexibility to create or design your model with required properties as per your requirement. The AES cryptography helps to encrypt user password before saving into the database. ASP.NET view are allows to users to register with application.
Now start creating ASP.NET MVC 5 project in Visual Studio 2013.
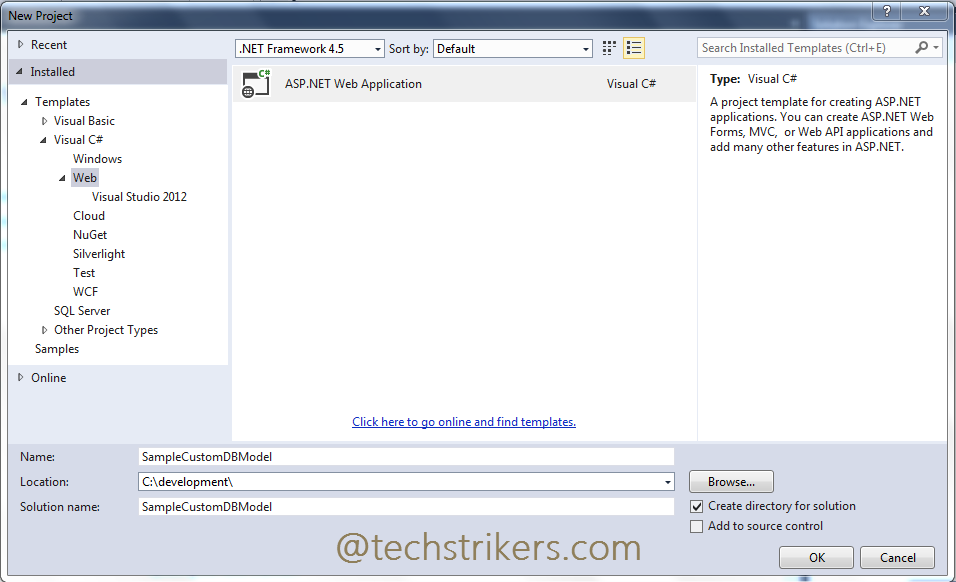
Step 1: Start Visual studio 2013, click on "New" Project from "File" menu and select "Web" and then "ASP.NET web application" from "New Project". I am selecting .Net framework 4.5 to build this sample application. All right, now give proper name as "CreateCustomizAuthentication" to application and click "Ok" button as below screen shot illustrate:
Step 2: Once done, you will see another window which asked to select "Template". Select "Empty" and checked "MVC" then click on "Ok" button as bellow screen shot illustrate:
Step 3: Now, right click on "Models" folder and add new class name as "UserAccount.cs". Now add user profile properties that you want to capture in registration page. Also add required validation as per your requirement. Remember, you need to add System.ComponentModel.DataAnnotations namespace which is required to add validation in model.
using System;
using System.Collections.Generic;
using System.Linq;
using System.Web;
using System.ComponentModel.DataAnnotations;

namespace CreateCustomizAuthentication.Models
{
    public class UserAccount
    {
        [Key]
        public int UserID { get; set; }
        [Required(ErrorMessage="User name is required")]
        public string UserName { get; set; }
        [Required(ErrorMessage = "Password is required")]
        [DataType(DataType.Password)]
        public string Password { get; set; }
        [Compare("Password",ErrorMessage="COnfirm password should be same as password")]
        [DataType(DataType.Password)]
        public string ConfirmPassword { get; set; }
        [Required(ErrorMessage = "First name is required")]
        public string FirstName { get; set; }
        [Required(ErrorMessage = "Lase name is required")]
        public string LastName { get; set; }
        [Required(ErrorMessage = "Email is required")]
        [EmailAddress]
        public string Email { get; set; }
        [DataType(DataType.Date)]
        public DateTime DOB { get; set; }
    }
}
Step 5: The DBContext class exposes DbSet property for the type that we want to expose from the model, in our example "userAccount". You can see here DbSet property is a collection of entity type (e.g. "UserAccount"). This DbSet property will be used to perform CRUD operations against a specific type from the model. Now add below code to "LoginDBContext.cs" class:
using System;
using System.Collections.Generic;
using System.Linq;
using System.Web;
using System.Data.Entity;

namespace CreateCustomizAuthentication.Models
{
    public class LoginDBContext:DbContext
    {
        public LoginDBContext()
            :base("AccountDataBase") {}
        public DbSet userAccount { get; set; }
    }
}
Step 6: Notice in above code, the constructor is used to pass connection string "AccountDataBase" to the base class which will be used to connect to SQL Server to create database and table. By default, the name of the DbContext class will be the name of our database that will be created automatically. You remember one thing here is that the connection string "AccountDataBase" name should be similar to connection string that you configure in "Web.Config" file.
Step 7: All right, right click on "Models" folder again and add another class name as "AESCryptography.cs". This class will contains "Encrypt" and "Decrypt" methods that will use ton encrypt and decrypt the user login information. Remember, you need to include System.Security.Cryptography namespace in your project.
using System;
using System.Collections.Generic;
using System.IO;
using System.Linq;
using System.Security.Cryptography;
using System.Text;
using System.Web;

namespace CreateCustomizAuthentication.Models
{
public class AESCryptography
{
public static string Encrypt(string clearText)
{
string EncryptionKey = "STRIKERS9072314";
byte[] clearBytes = Encoding.Unicode.GetBytes(clearText);
using (Aes encryptor = Aes.Create())
{
Rfc2898DeriveBytes pdb = new Rfc2898DeriveBytes(EncryptionKey, new byte[]
{ 0x49, 0x76, 0x61, 0x6e, 0x20, 0x4d, 0x65, 0x64, 0x76, 0x65, 0x64, 0x65, 0x76 });
encryptor.Key = pdb.GetBytes(32);
encryptor.IV = pdb.GetBytes(16);
using (MemoryStream ms = new MemoryStream())
{
	using (CryptoStream cs =
	new CryptoStream(ms, encryptor.CreateEncryptor(), CryptoStreamMode.Write))
	{
		cs.Write(clearBytes, 0, clearBytes.Length);
		cs.Close();
	}
	clearText = Convert.ToBase64String(ms.ToArray());
}
}
return clearText;
}

public static string Decrypt(string cipherText)
{
string EncryptionKey = "STRIKERS9072314";
byte[] cipherBytes = Convert.FromBase64String(cipherText);
using (Aes encryptor = Aes.Create())
{
Rfc2898DeriveBytes pdb = new Rfc2898DeriveBytes(EncryptionKey, new byte[]
{ 0x49, 0x76, 0x61, 0x6e, 0x20, 0x4d, 0x65, 0x64, 0x76, 0x65, 0x64, 0x65, 0x76 });
encryptor.Key = pdb.GetBytes(32);
encryptor.IV = pdb.GetBytes(16);
using (MemoryStream ms = new MemoryStream())
{
	using (CryptoStream cs =
	new CryptoStream(ms, encryptor.CreateDecryptor(), CryptoStreamMode.Write))
	{
		cs.Write(cipherBytes, 0, cipherBytes.Length);
		cs.Close();
	}
	cipherText = Encoding.Unicode.GetString(ms.ToArray());
}
}
return cipherText;
}
}
}
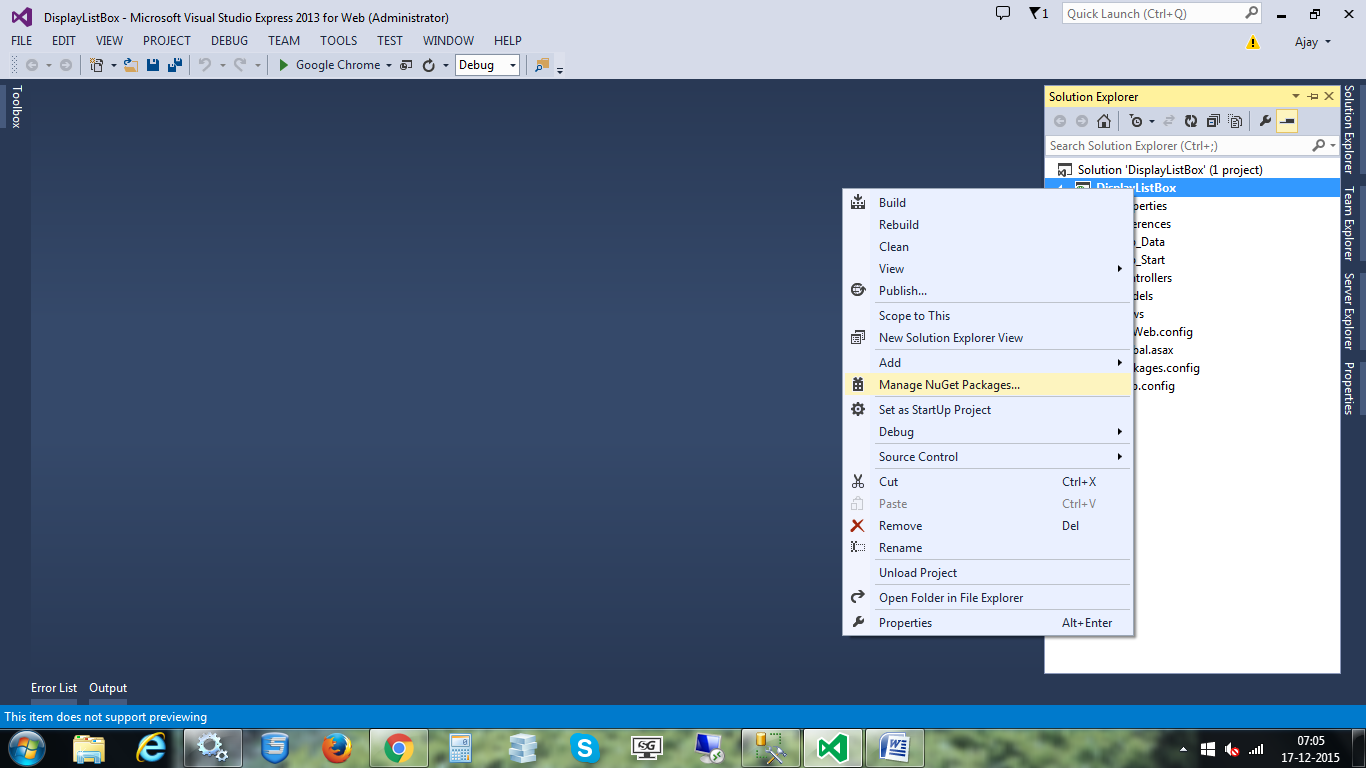
Step 8: Now, right click on project and build the application. Now right click on Controller folder and select Add and then empty "Controller". Give proper name to controller "AccountController" in our sample code.
Step 9: Add below code in "AccountController" class file.
using System;
using System.Collections.Generic;
using System.Linq;
using System.Web;
using System.Web.Mvc;
using CreateCustomizAuthentication.Models;
using System.Security.Cryptography;

namespace CreateCustomizAuthentication.Controllers
{
public class AccountController : Controller
{

public ActionResult Index()
{
	using (LoginDBContext db = new LoginDBContext())
	{
		return View(db.userAccount.ToList());
	}

}
public ActionResult Register()
{
	return View();
}
[HttpPost]
public ActionResult Register(UserAccount user)
{
	if (ModelState.IsValid)
	{
		using(LoginDBContext db = new LoginDBContext())
		{
		var get_user = db.userAccount.FirstOrDefault(p => p.UserName == user.UserName);
			if (get_user == null)
			{
				user.Password = AESCryptography.Encrypt(user.Password);
				user.ConfirmPassword = AESCryptography.Encrypt(user.ConfirmPassword);
				db.userAccount.Add(user);
				db.SaveChanges();
			}
			else
			{
				ViewBag.Message = "UserName already exists" + user.UserName;
				return View();
			}
		}
		ModelState.Clear();
		ViewBag.Message = "Successfully Registered Mr. " +
		user.FirstName + " " + user.LastName;
	}
	return RedirectToAction("Login");
}

public ActionResult Login()
{
	return View();
}
[HttpPost]
public ActionResult Login(UserAccount user)
{
	using (LoginDBContext db = new LoginDBContext())
	{
		var get_user = db.userAccount.Single(p => p.UserName == user.UserName
		&& p.Password == user.Password);
		if (get_user != null)
		{
			Session["UserId"] = get_user.UserID.ToString();
			Session["UserName"] = get_user.UserName.ToString();
			return RedirectToAction("LoggedIn");
		}
		else
		{
			ModelState.AddModelError("","UserName or Password does not match.");
		}

	}
	return View();
}

public ActionResult LoggedIn()
{
	object obj = Session["UserId"];
	if (obj != null)
	{
		return View();
	}
	else
	{
		return RedirectToAction("Login");
	}

}

}
}
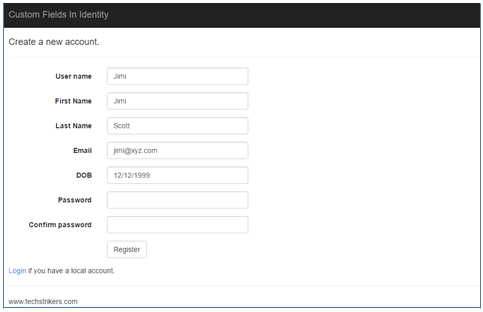
Step 9: Now, right click on "Index", "Register", "Login" and "LoggedIn" action method and add views. The views will allow users to perform register, login and logout operations. Add below code to your views.
@model IEnumerable
@{
    ViewBag.Title = "Index";
}
<h2>Index</h2>
<p>
    @Html.ActionLink("Create New", "Create")
</p>
<table class="table">
    <tr>
        <th>
            @Html.DisplayNameFor(model => model.UserName)
        </th>
        <th>
            @Html.DisplayNameFor(model => model.FirstName)
        </th>
        <th>
            @Html.DisplayNameFor(model => model.LastName)
        </th>
        <th>
            @Html.DisplayNameFor(model => model.Email)
        </th>
        <th>
            @Html.DisplayNameFor(model => model.DOB)
        </th>
        <th></th>
    </tr>

@foreach (var item in Model) {
    <tr>
        <td>
            @Html.DisplayFor(modelItem => item.UserName)
        </td>
        <td>
            @Html.DisplayFor(modelItem => item.FirstName)
        </td>
        <td>
            @Html.DisplayFor(modelItem => item.LastName)
        </td>
        <td>
            @Html.DisplayFor(modelItem => item.Email)
        </td>
        <td>
            @Html.DisplayFor(modelItem => item.DOB)
        </td>
    </tr>
}
</table>
@model CreateCustomizAuthentication.Models.UserAccount
@{
    ViewBag.Title = "Register";
}
<h2>Register</h2>

@using (Html.BeginForm())
{
    @Html.AntiForgeryToken()

    <div class="form-horizontal">
        <h4>UserAccount</h4>
        <hr />
        @Html.ValidationSummary(true)
        @if (ViewBag.Message != null)
        {
            <div class="form-group">
                <div class="col-md-10">@ViewBag.Message</div>
            </div>
        }
        <div class="form-group">
            @Html.LabelFor(model => model.UserName, new { @class = "control-label col-md-2" })
            <div class="col-md-10">
                @Html.EditorFor(model => model.UserName)
                @Html.ValidationMessageFor(model => model.UserName)
            </div>
        </div>

        <div class="form-group">
            @Html.LabelFor(model => model.Password, new { @class = "control-label col-md-2" })
            <div class="col-md-10">
                @Html.EditorFor(model => model.Password)
                @Html.ValidationMessageFor(model => model.Password)
            </div>
        </div>

        <div class="form-group">
            @Html.LabelFor(model => model.ConfirmPassword, new { @class = "control-label col-md-2" })
            <div class="col-md-10">
                @Html.EditorFor(model => model.ConfirmPassword)
                @Html.ValidationMessageFor(model => model.ConfirmPassword)
            </div>
        </div>

        <div class="form-group">
            @Html.LabelFor(model => model.FirstName, new { @class = "control-label col-md-2" })
            <div class="col-md-10">
                @Html.EditorFor(model => model.FirstName)
                @Html.ValidationMessageFor(model => model.FirstName)
            </div>
        </div>

        <div class="form-group">
            @Html.LabelFor(model => model.LastName, new { @class = "control-label col-md-2" })
            <div class="col-md-10">
                @Html.EditorFor(model => model.LastName)
                @Html.ValidationMessageFor(model => model.LastName)
            </div>
        </div>

        <div class="form-group">
            @Html.LabelFor(model => model.Email, new { @class = "control-label col-md-2" })
            <div class="col-md-10">
                @Html.EditorFor(model => model.Email)
                @Html.ValidationMessageFor(model => model.Email)
            </div>
        </div>

        <div class="form-group">
            @Html.LabelFor(model => model.DOB, new { @class = "control-label col-md-2" })
            <div class="col-md-10">
                @Html.EditorFor(model => model.DOB)
                @Html.ValidationMessageFor(model => model.DOB)
            </div>
        </div>

        <div class="form-group">
            <div class="col-md-offset-2 col-md-10">
                <input type="submit" value="Create" class="btn btn-default" />
            </div>
        </div>
    </div>
}

<div>
    @Html.ActionLink("Back to List", "Index")
</div>

@section Scripts {
    @Scripts.Render("~/bundles/jqueryval")
}
@model CreateCustomizAuthentication.Models.UserAccount
@{
    ViewBag.Title = "Login";
}

<h2>Login</h2>
@using (Html.BeginForm())
{
    @Html.AntiForgeryToken()

    <div class="form-horizontal">
        <h4>UserAccount</h4>
        <hr />
        @Html.ValidationSummary(true)

        <div class="form-group">
            @Html.LabelFor(model => model.UserName, new { @class = "control-label col-md-2" })
            <div class="col-md-10">
                @Html.EditorFor(model => model.UserName)
                @Html.ValidationMessageFor(model => model.UserName)
            </div>
        </div>

        <div class="form-group">
            @Html.LabelFor(model => model.Password, new { @class = "control-label col-md-2" })
            <div class="col-md-10">
                @Html.EditorFor(model => model.Password)
                @Html.ValidationMessageFor(model => model.Password)
            </div>
        </div>

        <div class="form-group">
            <div class="col-md-offset-2 col-md-10">
                <input type="submit" value="Login" class="btn btn-default" />
            </div>
        </div>
    </div>
}

<div>
    @Html.ActionLink("Back to List", "Index")
</div>

@section Scripts {
    @Scripts.Render("~/bundles/jqueryval")
}
@{
    ViewBag.Title = "LoggedIn";
}
@if (Session["UserName"] != null)
{
    Hello, @Session["UserName"].ToString()
}
Step 9: In the sample code I am using existing database to create "UserAccount" table.
<connectionStrings>
    <add name="IdentityDataBase"
      connectionString="MultipleActiveResultSets=True;Data Source=(local);
	  Initial Catalog=MyTestDB;user id=sa;password=wweq12$;
	  Min Pool Size=10;Max Pool Size=60;Connect Timeout=1000;"
	  providerName="System.Data.SqlClient"/>
  </connectionStrings>
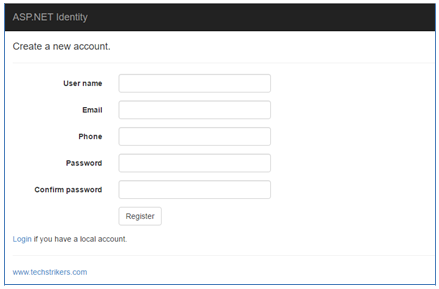
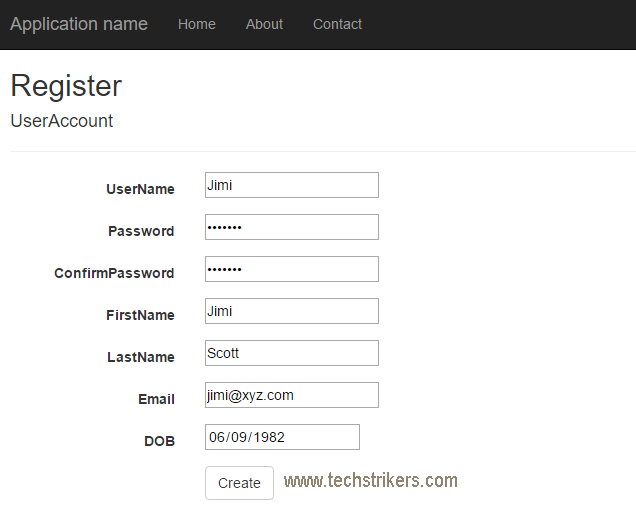
Step 10: All right, run the application, Enter required fields in registration page and click on "Create" button. After successful registration you will redirected to "Login" page. Now login with registered user name and click on "Login" button i.e. "Jimi" in example code.

Appreciate your valuable feedback:
I hope this article is useful for you. I look forward for your comments and feedback. So please provide your valuable feedback so that I can make this blog better. You can also share this article by hitting below button.
Happy learning...