How to extend the properties of Identity with additional custom properties in ASP.NET
Posted By: Ajay Saptaputre, 03 Jan,2016 | Total View : 13736
In my previous article I discussed about Understanding ASP.NET Identity , ASP.NET Identity Vs Membership System and Features of ASP.NET Identity .
In this article I am going to explain how to extend the properties of User.Identity with additional custom properties like address, DOB etc. ASP.NET Identity gives opportunity to add login features that is related to your application and makes it easy to customize data about the logged in user.
ASP.NET Identity is a new approach to implement ASP.NET membership, which was designed and developed to solve requirement that includes forms authentication, SQL Server database for user names, passwords and profile data as well. ASP.NET membership has some limitations and makes this transition difficult.
Membership API Limitations
- Membership uses non-relational store data for persistence.
- With Membership it was hard to use it with OWIN.
- Membership not supported extensibility.
Why ASP.NET Identity
ASP.NET Identity supports all types of ASP.NET applications like Web Forms, MVC, Web API, SignalR or web pages. ASP.NET Identity system is easy to customize. You can add new fields to user profile in no time.
ASP.NET Identity is designed based on interfaces which means highly customizable. If you don't like one part of system, you can replace it with your object. ASP.NET Identity default implementation uses Entity Framework code first. It means database schema design is in your hands, you can easily extend table fields, change table names, primary keys, data types etc.
By default, ASP.NET Identity uses SQL Server database. But you have greater flexibility to change with other database such as Oracle, MySQL, SharePoint, NoSql and any other database.
ASP.NET Identity makes it easy to customize user profile and add Login or Log out functionality to the application. Identity includes user profile, OAuth integration, works with OWIN, and is included with the ASP.NET templates shipped with Visual Studio 2013.
Today, all most all application site owners want to allow users to use social identity provider for authentication and authorization. The web has become more social now a day's and users using social networking site like Google, Facebook and Twitter. Site owner want users to be able to login using their social account so that they can be provided with rich user experience.
Customize ASP.NET Identity properties with example step by step
So let's open Visual Studio and start creating new MVC 5 project. In this article I am using Visual Studio Express 2013 for Web but you can use Visual Studio 2013 as well.
Now start creating ASP.NET MVC 5 project in Visual Studio 2013.
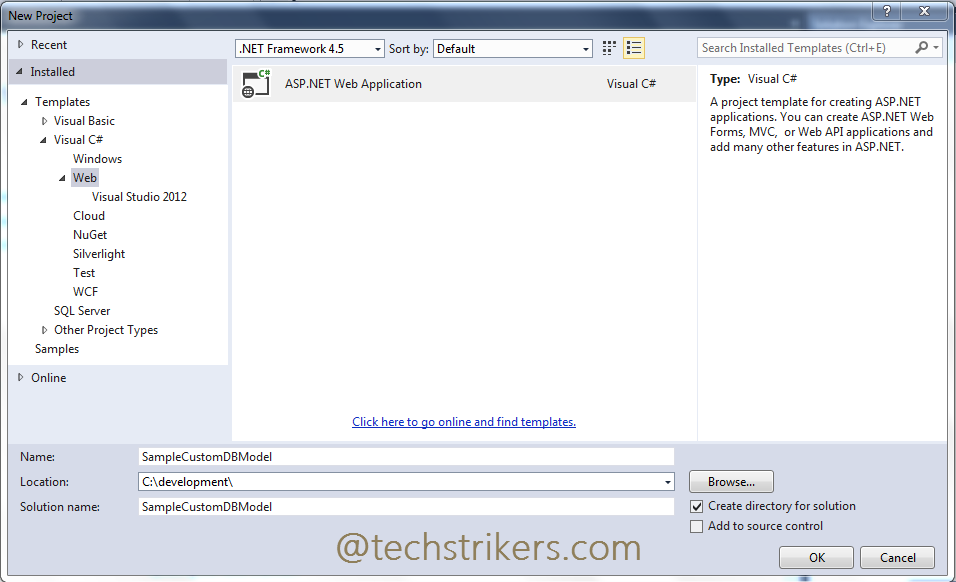
Step 1: Start Visual studio 2013, click on "New" Project from "File" menu and select "Web" and then "ASP.NET web application" from "New Project". I am selecting .Net framework 4.5 to build this sample application. All right, now give proper name as "ASPNETIdentity" to your application and click "Ok" button as below screen shot illustrate:
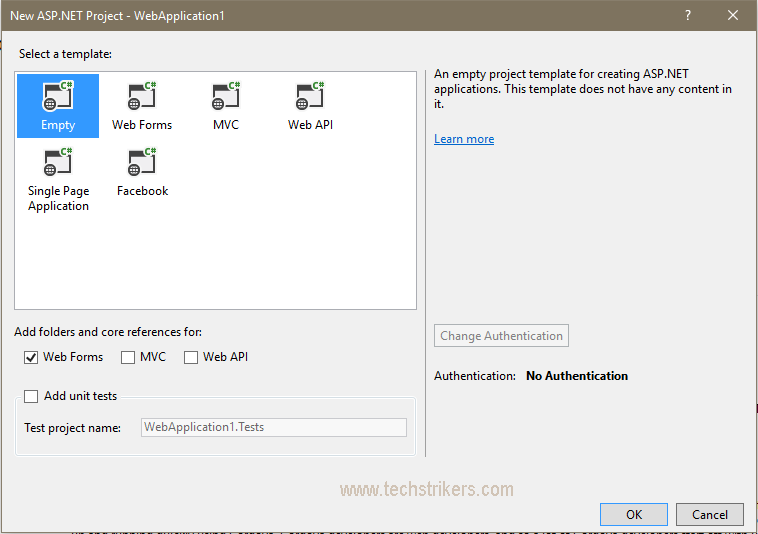
Step 2: Once done, you will see another window which asked to select "Template". Select "Empty" and checked "Web Form" then click on "Ok" button as bellow screen shot illustrate:
Step 3: Now, you will need to add below listed packages that will help you to implement ASP.NET Identity in your application. All right, right click on project or go to "Tool" menu and select "Library Package Manager" and then select "Manage NuGet Package for Solution..." option.
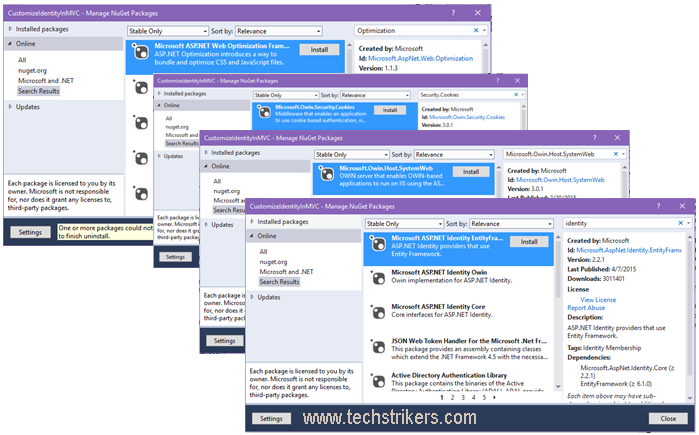
Microsoft.AspNet.Identity.EntityFramework
Microsoft.AspNet.Identity.Core
Microsoft.Owin.Host.SystemWeb
Microsoft.Owin.Security.Cookies
Microsoft.AspNet.Web.Optimization
Step 4: Now, add new class file in your project and name as "LoginUser.cs". Add below code in newly added class file. You can observe that "LoginUser" class is deriving from "IdentityUser" base class. By deriving from "IdentityUser" class gives you opportunity to extend or add additional custom properties in user profile that you want capture in user registration. In order to use Entity Framework code first, you will need to create "DbContext" class that derives from "IdentityDbContext" class by passing "LoginUser" class.
Remember; don't forget to add Microsoft.AspNet.Identity.EntityFramework namespace in class file.
using System;
using System.Collections.Generic;
using System.Linq;
using System.Web;
using Microsoft.AspNet.Identity.EntityFramework;

namespace ASP.NETIdentityCustom
{
    public class LoginUser : IdentityUser
    {
        public string Phone { get; set; }
        public string Email { get; set; }
        public DateTime DOB { get; set; }
        public string Address { get; set; }
    }
    public class ApplicationDbContext : IdentityDbContext
    {
        public ApplicationDbContext()
            : base("DefaultConnection")
        {
        }
    }
}
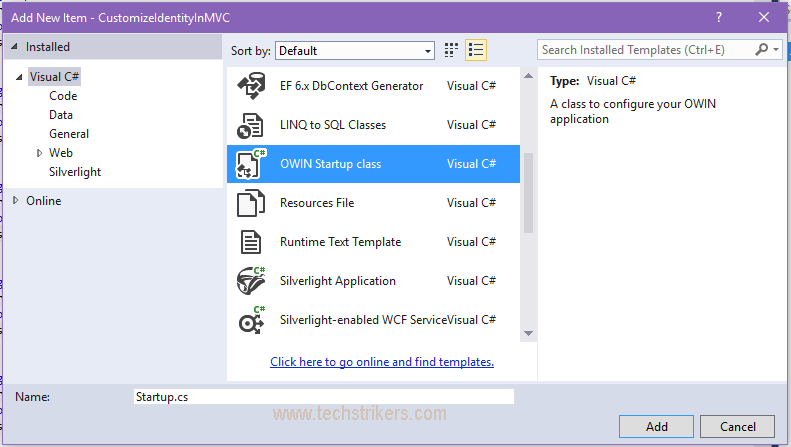
Step 5: Now, add new class file "Owin Startup class" in your project and name as "Startup.cs". In the MVC 5 templates, the Startup class is used to wire up the authentication middleware which is all built on top of OWIN. The Startup class is basically convention for Katana/OWIN to initialize the pipeline. When you run your application, the code inside of the Startup class will run to set up the components that will be used. Add below code in newly added class file.
using System;
using System.Threading.Tasks;
using Microsoft.Owin;
using Owin;
using Microsoft.AspNet.Identity;
using Microsoft.Owin.Security.Cookies;
using Microsoft.AspNet.Identity.EntityFramework;

[assembly: OwinStartup(typeof(ASP.NETIdentityCustom.Startup))]

namespace ASP.NETIdentityCustom
{
    public class Startup
    {
        public void Configuration(IAppBuilder app)
        {
            // For more information on how to configure your application,
			// visit https://go.microsoft.com/fwlink/?LinkID=316888
            app.UseCookieAuthentication(new CookieAuthenticationOptions
			{
				AuthenticationType= DefaultAuthenticationTypes.ApplicationCookie,
				LoginPath = new PathString("/Login")
			});
        }
    }
}
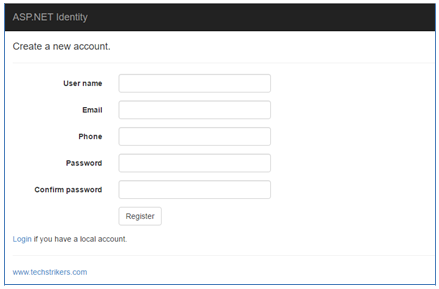
Step 6: Now, you will need to add login page to your project for user login and name as "Login.aspx". Add below code in newly added page "Login.aspx" and "Login.aspx.cs".
<%@ Page Language="C#" AutoEventWireup="true" CodeBehind="Login.aspx.cs"
Inherits="ASP.NETIdentityCustom.Login" %>
<!DOCTYPE html>
<html xmlns="https://www.w3.org/1999/xhtml">
<head runat="server">
    <title></title>
</head>
<body>
    <form id="form1" runat="server">
	<div>
	Login Page<br />
	<br />
	<asp:PlaceHolder ID="LoginStatus" runat="server">
		<asp:Literal ID="StatusText" runat="server"></asp:Literal>
	</asp:PlaceHolder>
	<br />
	<br />
	<asp:PlaceHolder ID="LoginForm" runat="server">
	<asp:Label ID="Label1" runat="server" Text="User Name"></asp:Label>
	<br />
	<asp:TextBox ID="txtUserName" runat="server"></asp:TextBox>
	<br />
	<asp:Label ID="Label2" runat="server" Text="Password"></asp:Label>
	<br />
	<asp:TextBox ID="txtPassword" runat="server" TextMode="Password"></asp:TextBox>
	<br />
	<asp:Button ID="btnLogin" runat="server" Text="Login" Width="102px"
	OnCLick="btnLogin_Click" />
	<br />
</asp:PlaceHolder>
<asp:PlaceHolder ID="LogoutButton" runat="server">
	<br />
	<asp:Button ID="txtSignOut" runat="server" Text="SignOut" Width="103px"
	OnCLick="btnSignOut_Click" />
	<br />
</asp:PlaceHolder>
	</div>
</form>
</body>
</html>
using System;
using System.Collections.Generic;
using System.Linq;
using System.Web;
using System.Web.UI;
using System.Web.UI.WebControls;
using Microsoft.AspNet.Identity;
using Microsoft.AspNet.Identity.EntityFramework;
using Microsoft.Owin.Security;

namespace ASP.NETIdentityCustom
{
public partial class Login : System.Web.UI.Page
{
 public Login()
	: this(new UserManager(new UserStore(new ApplicationDbContext())))
{
}
public Login(UserManager userManager)
{
	UserManager = userManager;
}
public UserManager UserManager { get; private set; }
protected void Page_Load(object sender, EventArgs e)
{
	if(!IsPostBack)
	{
		StatusText.Text = string.Format("Hello, {0}", User.Identity.GetUserName());
		LoginStatus.Visible = true;
		LogoutButton.Visible = true;
	}
	else
	{
		LoginForm.Visible = true;
	}
}
protected void btnLogin_Click(object sender, EventArgs e)
{
var user = UserManager.Find(txtUserName.Text, txtPassword.Text);
if (user != null)
{
var authenticationManager = HttpContext.Current.GetOwinContext().Authentication;
var userIdentity =
UserManager.CreateIdentity(user, DefaultAuthenticationTypes.ApplicationCookie);
authenticationManager.SignIn(new AuthenticationProperties() { }, userIdentity);
Response.Redirect("~/Login.aspx");
}
else
{
	StatusText.Text = "Invalid login or password";
	LoginStatus.Visible = true;
}
}
protected void btnSignOut_Click(object sender, EventArgs e)
{
	var authenticationManager = HttpContext.Current.GetOwinContext().Authentication;
	authenticationManager.SignOut();
	Response.Redirect("~/Login.aspx");
}
}
}
Step 7: Now, you will need to add register page to your project for user registration and name as "Register.aspx". Add below code in newly added page "Register.aspx" and "Register.aspx.cs".
<%@ Page Language="C#" AutoEventWireup="true" CodeBehind="Register.aspx.cs"
Inherits="ASP.NETIdentityCustom.Register" %>
<!DOCTYPE html>
<html xmlns="https://www.w3.org/1999/xhtml">
<head runat="server">
    <title></title>
</head>
<body>
<form id="form1" runat="server">
<div>
	New User Registeration<br />
	<asp:Literal ID="StatusMessage" runat="server"></asp:Literal>
	<br />
	<asp:Label ID="Label1" runat="server" Text="User Name"></asp:Label>
	<br />
	<asp:TextBox ID="txtUserName" runat="server"></asp:TextBox>
	<br />
	<asp:Label ID="Label2" runat="server" Text="Password"></asp:Label>
	<br />
	<asp:TextBox ID="txtPassword" runat="server" TextMode="Password"></asp:TextBox>
	<br />
	<asp:Label ID="Label3" runat="server" Text="Confirm Password"></asp:Label>
	<br />
	<asp:TextBox ID="txtConfirmPassword" runat="server" TextMode="Password"></asp:TextBox>
	<br />
	<asp:Label ID="Label4" runat="server" Text="Email"></asp:Label>
	<br />
	<asp:TextBox ID="txtEmail" runat="server" Width="179px"></asp:TextBox>
	<br />
	<asp:Label ID="Label5" runat="server" Text="Phone No"></asp:Label>
	<br />
	<asp:TextBox ID="txtPhone" runat="server" Width="181px"></asp:TextBox>
	<br />
	<asp:Label ID="Label7" runat="server" Text="DOB"></asp:Label>
	<br />
	<asp:TextBox ID="txtDOB" runat="server" Width="181px"></asp:TextBox>
	<br />
	<asp:Label ID="Label6" runat="server" Text="Address"></asp:Label>
	<br />
	<asp:TextBox ID="txtAddress" runat="server" Width="178px"></asp:TextBox>
	<br />
	<asp:Button ID="Button1" runat="server" OnClick="Button1_Click"
	Text="Register" Width="101px" />
</div>
</form>
</body>
</html>
using System;
using System.Collections.Generic;
using System.Linq;
using System.Web;
using System.Web.UI;
using System.Web.UI.WebControls;
using Microsoft.AspNet.Identity;
using Microsoft.AspNet.Identity.EntityFramework;
using Microsoft.Owin.Security;

namespace ASP.NETIdentityCustom
{
public partial class Register : System.Web.UI.Page
{
public Register()
: this(new UserManager(new UserStore(new ApplicationDbContext())))
{
}
public Register(UserManager userManager)
{
	UserManager = userManager;
}

public UserManager UserManager { get; private set; }
protected void Page_Load(object sender, EventArgs e)
{
}
protected void Button1_Click(object sender, EventArgs e)
{
var user = new LoginUser() { UserName = txtUserName.Text, Address = txtAddress.Text,
Email = txtEmail.Text, Phone = txtPhone.Text, DOB = Convert.ToDateTime(txtDOB.Text) };
IdentityResult result = UserManager.Create(user, txtPassword.Text);
if (result.Succeeded)
{
StatusMessage.Text = string.Format("User {0} Successfully Created", user.UserName);
var authenticationManager = HttpContext.Current.GetOwinContext().Authentication;
var userIdentity =
UserManager.CreateIdentity(user, DefaultAuthenticationTypes.ApplicationCookie);
authenticationManager.SignIn(new AuthenticationProperties() { }, userIdentity);
Response.Redirect("~/Login.aspx");
}
else
{
	StatusMessage.Text = result.Errors.FirstOrDefault();
}
}
}
}
Step 8: Now, open web.config file and add below connection string code.
<connectionStrings>
<add name="DefaultConnection" connectionString="Data Source=(LocalDb)\v11.0;AttachDbFilename=|DataDirectory|\CustomizeIdentity.mdf;
Initial Catalog=CustomizeIdentity;Integrated Security=True"
  providerName="System.Data.SqlClient" />
  </connectionStrings>
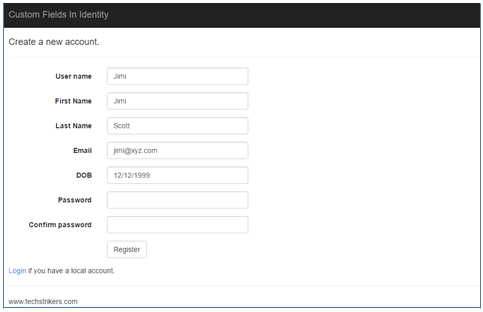
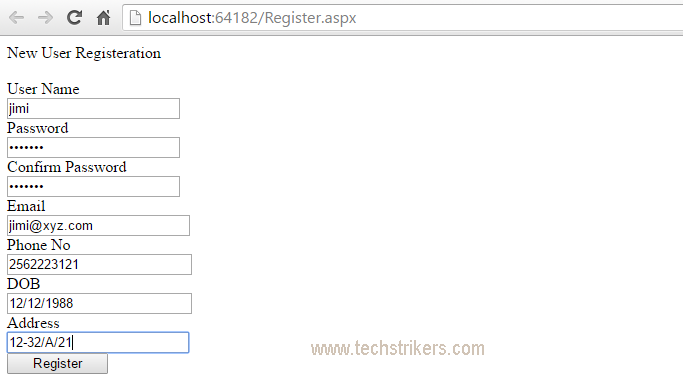
Step 9: All right, now your application is ready to run. Enter required fields in registration page and click on "Register" button. After successful registration you will redirected to "login" page with registered user name and "SignOut" button i.e. "Jimi" in example code.
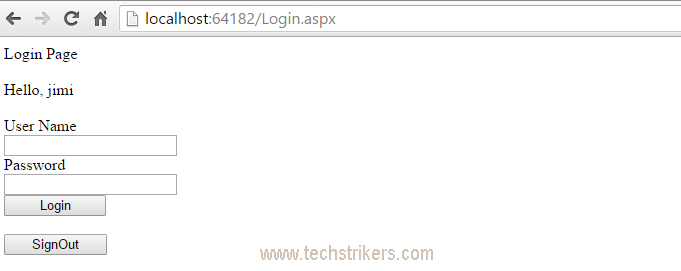
Step 10: Now click on "SignOut" button from login page and login with your username and password. You will be able to see "Hello,"<username> on top of the login page after successful login.
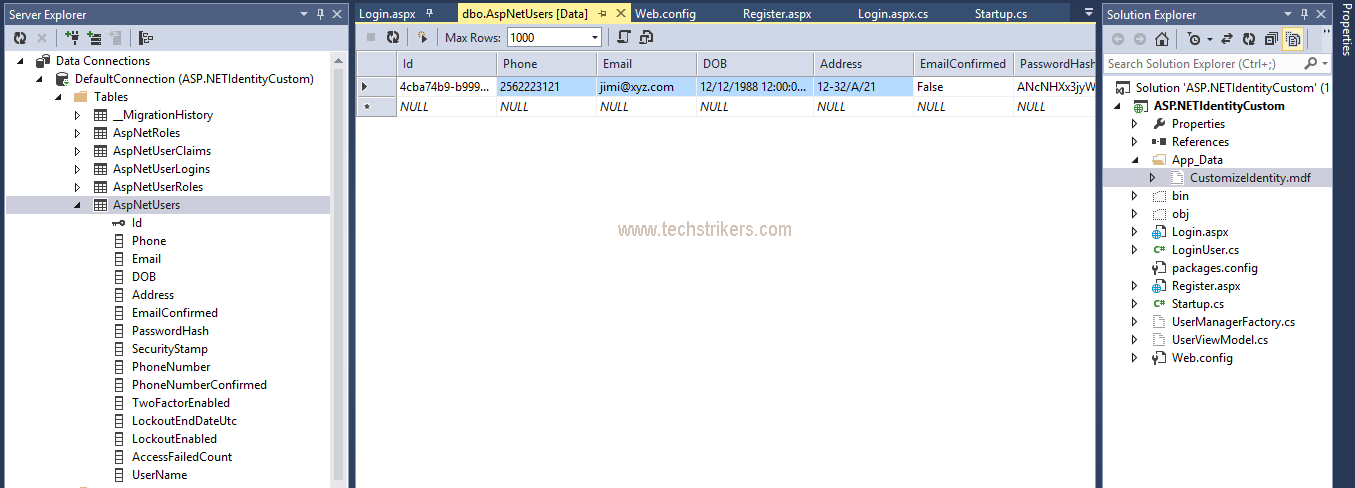
Step 11: All right, you would like to see your extended fields (Address DOB in our example) are created in "AspNetUsers" table or not right? So double cick on "App_Data" folder in your project and then on "CustomizeIdentity.mdf" file as you can see in below screen shot. You will find that "IdentityDbContext" included your customize users profile fields.
Appreciate your valuable feedback:
I hope this article is useful for you. I look forward for your comments and feedback. So please provide your valuable feedback so that I can make this blog better. You can also share this article by hitting below button.
Happy learning...