Export Report as CSV or XLSX or XLS from ReportViewer in ASP.NET
Posted By: Ajay Saptaputre, 12 Dec,2015 | Total View : 17147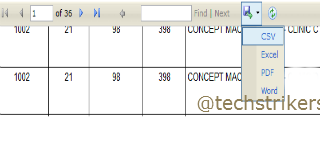
In my previous article I discussed about JQuery DataTable Bind JSON Using ASP.NET MVC 5 and Entity Framework 6 and Scheduled Tasks In ASP.NET With Quartz.Net and JQGrid Server-Side processing using HttpHandler in ASP.NET.
In this article I am going to discuss how to export report as CSV or XLSX or XLS from ReportViewer in ASP.NET. In ASP.NET web application export to CSV option is missing from export option dropdown list in ReportViewer control. In this article I will discuss how to add CSV export options in ReportViewer control and implement custom CSV export from ReportViewer functionality. I will also discuss how to remove and add custom "Excel" option in ReportViewer control and implement custom XLSX export functionality.
Note, in this article I am not creating RDLC report, assuming that RDLC report already exists in web application. I will show how to add CSV and Excel custom option after removing the existing Excel option from ReportViewer.
Remove Excel Option and Add CSV and Excel Option in ReportViewer
In order to remove existing Excel export option from ReportViewer control is quite simple. You can use Javascript or JQuery to do so. In this sample, I am using JQuery to remove Excel option. Also, adding custom CSV and Excel export option in ReportViewer control. To implement custom export functionality, I am using onClick event to give custom export implementation for CSV and Excel option. Here JavaScript functions "downloadExcelReport()" and "downloadCSVReport()" will be called. See below code snippet:<script type="text/javascript">
$(document).ready(function () {
if ($("#rptScheduledClinicsReport_ctl06_ctl04_ctl00_Menu") != null
&& $("#rptScheduledClinicsReport_ctl06_ctl04_ctl00_Menu") != undefined) {
$('#rptScheduledClinicsReport_ctl06_ctl04_ctl00_Menu').find('div').first().remove();
$("#rptScheduledClinicsReport_ctl06_ctl04_ctl00_Menu")
.prepend("<div style='border:1px transparent Solid;'><a onclick='ExportExcelReport();'
href='javascript:void(0)' style='color:#3366CC;font-family:Verdana;font-size:8pt;padding:3px 8px 3px 8px;display:block;
white-space:nowrap;text-decoration:none;'>Excel</a></div>");
$("#rptScheduledClinicsReport_ctl06_ctl04_ctl00_Menu").prepend("<div style='border:1px transparent Solid;
'><a onclick='ExportCSVReport();' href='javascript:void(0)'
style='color:#3366CC;font-family:Verdana;font-size:8pt;padding:3px 8px 3px 8px;display:block;
white-space:nowrap;text-decoration:none;'>CSV</a></div>");
}
}
</script>
Implement JavaScript Export Methods
Now, you will need to give implementation for "ExportExcelReport()" and "ExportCSVReport()" JavaScript functions. So let's add JavaScript functions and call __doPostBack function. The __doPostBack function is used to trigger the postback. If you look at the __doPostBack function you will notice that the second argument is called the eventArgument. The __doPostBack function contains two arguments, eventTarget and eventArgument. The eventTarget is "typeCSV" and the eventArgument is "csv". Similarly, "typeExcel" and "excel". See below code snippet:function ExportCSVReport() {
__doPostBack("typeCSV", "csv");
}
function ExportExcelReport() {
__doPostBack("typeExcel", "excel");
}
Add Code in Page_Load
Now add below code to Page_Load event in code behind. In the below code, I am reading request object and validating for "csv" or "excel" then calling appropriate export function. See below code snippet:protected void Page_Load(object sender, EventArgs e)
{
if (!IsPostBack)
{
//To bind RDLC report with data source.
this.reportBind();
}
if (Page.IsPostBack)
{
string contact_args = Request["__EVENTARGUMENT"];
if (!string.IsNullOrEmpty(contact_args) && contact_args.ToLower() == "csv")
this.ExportCSVReport(); //Exporting CSV from datatable
if (!string.IsNullOrEmpty(contact_args) && contact_args.ToLower() == "excel")
this.ExportExcelReport(); //Exporting Excel from ReportViewer
}
}
Implement Export Methods
All right, now add below methods in code behind to make download happened. When user select "CSV" or "Excel" option from export option in ReportViewer control it will start download appropriate file. See below code snippet:/// <summary>
/// This method will be use to download Excel report from ReportViewer
/// </summary>
private void ExportExcelReport()
{
byte[] bytes = rptEmployeeReport.LocalReport.Render("Excel");
this.downloadReport(bytes, "xls");
}
/// <summary>
/// This method will use to download CSV format report from DataTable
/// </summary>
protected void ExportCSVReport()
{
DataTable dt_sc_report = new DataTable();
DataAccessLib db = new DataAccessLib();
dt_sc_report = db.getEmployeeReport();
var export = new ExportToCSV();
foreach (DataRow row in dt_sc_report.Rows)
{
export.AddRow();
foreach (DataColumn column in dt_sc_report.Columns)
{
export[column.ColumnName] = row[column].ToString();
}
}
byte[] csv_data = export.ExportToBytes();
this.downloadReport(csv_data, "csv");
}
/// <summary>
/// This common function for download report
/// </summary>
/// <param name="data"></param>
/// <param name="format"></param>
private void downloadReport(byte[] data, string format)
{
Stream stream = new MemoryStream(data);
byte[] buffer = new Byte[10000];
int length;
long data_length;
try
{
data_length = stream.Length;
Response.ContentType = "application/octet-stream";
Response.AddHeader("Content-Disposition", "attachment; filename=confirmClinicDetails." + format);
while (data_length > 0)
{
if (Response.IsClientConnected)
{
length = stream.Read(buffer, 0, 10000);
Response.OutputStream.Write(buffer, 0, length);
Response.Flush();
buffer = new Byte[10000];
data_length = data_length - length;
}
else
{
data_length = -1;
}
}
}
finally
{
if (stream != null) { stream.Close(); }
Response.Close();
}
}
Run ASP.NET Web Application
Now our sample ASP.NET web application is ready to run. Press Ctrl + F5 and run the application, you can see below output in browser.
Appreciate your valuable feedback:
I hope this article is useful for you. I look forward for your comments and feedback. So please provide your valuable feedback so that I can make this blog better. You can also share this article by hitting below button.
Happy learning...
Download Code ⇩