How Email Can be Used to Track User IP address Using ASP.NET
Posted By: Ajay Saptaputre, 14 Oct,2015 | Total View : 3297
In my previous article I discussed about CRUD Operations Using MVCContrib Grid with ASP.NET MVC 5 and Entity Framework 6 and CRUD Operations Using NHibernate with ASP.NET MVC 5 and Export To Excel From WebGrid In ASP.NET MVC5 and Entity Framework 6
In this article I am going to discuss how to get client IP Address in asp.net web application. In email marketing sometimes you may require to track users IP address that has opened your sent email. When user opens email from mailbox, the "ProcessRequest" of "image.ashx" file will be fire, where you can track user's IP address.
The idea behind tracking user IP address using email is first email will be sent to the respective users. The email template will contains very small image, size 1px will load using ".ashx" file instead of actual image. When email starts rendering at client side "MailBox" the ".ashx" file will request to the server for image file, where you can track IP address and store in database or in text file. In this sample code I am using simple text file to store user IP addresses.
Step 1: Let's start simple ASP.NET empty web application and add "Default.aspx" file to your project". Add below code to "Default.aspx.cs" file.
using System;
using System.Collections.Generic;
using System.Linq;
using System.Web;
using System.Web.UI;
using System.Web.UI.WebControls;
using System.Net.Mail;
using System.IO;
using System.Configuration;

public partial class _Default : System.Web.UI.Page
{
    protected void Page_Load(object sender, EventArgs e)
    {
	this.SendHtmlFormattedEmail("[email protected]",
	"TestMail", this.PopulateBody());
    }
    private void SendHtmlFormattedEmail(string recepientEmail,
	string subject, string body)
    {
	using (MailMessage mailMessage = new MailMessage())
	{
	mailMessage.From =
	new MailAddress(ConfigurationManager.AppSettings["MailAddress"]);
	mailMessage.Subject = subject;
	mailMessage.Body = body;
	mailMessage.IsBodyHtml = true;
	mailMessage.To.Add(new MailAddress(recepientEmail));
	SmtpClient smtp = new SmtpClient();
	smtp.Host = ConfigurationManager.AppSettings["Host"];
	System.Net.NetworkCredential NetworkCred = new System.Net.NetworkCredential();
	NetworkCred.UserName = ConfigurationManager.AppSettings["UserName"];
	NetworkCred.Password = ConfigurationManager.AppSettings["Password"];
	smtp.UseDefaultCredentials = true;
	smtp.Credentials = NetworkCred;
	smtp.Port = Convert.ToInt32(ConfigurationManager.AppSettings["Port"]);
	smtp.Send(mailMessage);
	}
    }
    private string PopulateBody()
    {
        string body = string.Empty;
        using (StreamReader reader = new StreamReader(Server.MapPath("~/TestMail.htm")))
        {
            body = reader.ReadToEnd();
        }
        return body;
    }
}
Step 2: Now add "image.ashx" file in your project". Add below code to the "image.ashx" file.
<%@ WebHandler Language="C#" Class="image" %>
using System;
using System.Web;
using System.Drawing;
using System.Drawing.Imaging;
using System.Web.UI.WebControls;
using System.Collections.Generic;
using System.Web.UI;
using System.Net.Mail;
using System.IO;

public class image : IHttpHandler {

public void ProcessRequest(HttpContext context)
{
	Bitmap bmp = new Bitmap(1, 1);
	Graphics graphics = Graphics.FromImage(bmp);

	int width = (int)Math.Ceiling(1.0);
	int height = (int)Math.Ceiling(1.0);

	bmp = new Bitmap(bmp, width, height);
	graphics.Dispose();
	graphics = Graphics.FromImage(bmp);
	graphics.Clear(Color.White);

	graphics.Dispose();
	bmp.Save(context.Response.OutputStream, ImageFormat.Gif);

	string ip_address = "";
	if (string.IsNullOrEmpty(
	HttpContext.Current.Request.ServerVariables["HTTP_X_FORWARDED_FOR"]))
	{
		ip_address = HttpContext.Current.Request.ServerVariables["REMOTE_ADDR"];
	}
	else
	{
	 ip_address = HttpContext.Current.Request.ServerVariables["HTTP_X_FORWARDED_FOR"]
	 .Split(",".ToCharArray(),
	 StringSplitOptions.RemoveEmptyEntries)[0];
	}

	using (System.IO.StreamWriter writer =
	new System.IO.StreamWriter(context.Server.MapPath("IPAddress.txt"), true))
	{
		writer.WriteLine(ip_address);
	}
    }
public bool IsReusable {
	get {
		return false;
	}
}
}
Step 3: You will need email template to send formatted email to the user. So let's add email template file "TestMail.htm" to your project and add below code to the file.
<!DOCTYPE html PUBLIC "-//W3C//DTD XHTML 1.0 Transitional//EN"
"https://www.w3.org/TR/xhtml1/DTD/xhtml1-transitional.dtd">

<html xmlns="https://www.w3.org/1999/xhtml">
 <head><title></title></head>
<body>
<img src="https://localhost/GetIP/image.ashx" /><br /><br />
<div style = "border-top:3px solid #22BCE5"> </div>
<span style = "font-family:Arial;font-size:10pt">
Hello User, Please click here to <a style = "color:#22BCE5"
href="https://localhost/GetIP/Default.aspx">Confirm Link</a><br />
<br />
Thanks<br />
</span>
</body>
</html>
Step 4: In order to store user's IP addresses, you will need to add another file "IPAddress.txt" to your project.
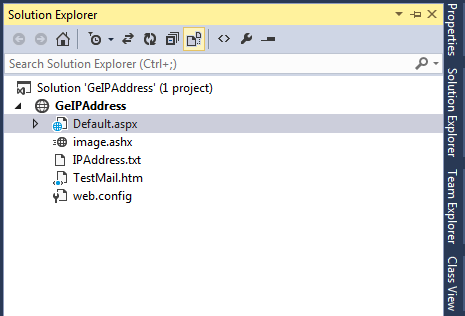
Step 5: After adding the entire above discussed file, the solution explorer will looks like below screen shot:
Step 6: When you run the application, it will execute "SendHtmlFormattedEmail" function. The "SendHtmlFormattedEmail" function taking user's email, subject and email template (as email body) and sending email to the user. When user open email from mailbox, the "ProcessRequest" of "image.ashx" file will fire, this is the place where you can track users IP address. See above code.
Appreciate your valuable feedback:
I hope this article is useful for you. I look forward for your comments and feedback. So please provide your valuable feedback so that I can make this blog better. You can also share this article by hitting below button.
Happy learning...